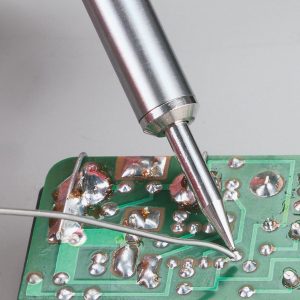
With so many different options on the market, a high quality soldering iron can help you repair your broken electronics and circuit boards, for arts and crafts, making jewelry and more. Soldering irons have uses for casual hobbyists and professional tradesmen alike.
A soldering iron is a compact pen-like tool with a metal end that when hot, can melt solder, a special type of metal alloy that can fuse two materials together. The tip can be heated either through a gas like butane, or more commonly with electricity. Soldering stations are a lot like a soldering iron, but they include a base to hold it and typically include features such as a variable temperature control, digital display, and additional watts of power output.
Although there is a bit of a learning curve, a high quality soldering iron can be the difference between a tough job and an easy one. So it’s easy to see why anyone with even a bit of a DIY experience needs one. Because every soldering station is a little different, we spent hours testing different models to find the best soldering solution for every purpose.
The Best Soldering Station For Each Purpose
This might seem like a lot of options, but soldering is a practice that’s used in all types of applications. Choosing the soldering station that’s right for you means determining what types of projects you plan to be working on, and determining how often you need to solder. We broke our choices down into several categories. First, we’ll look and see how our top choices compare to one another. After, we’ll go in-depth to find out what each soldering iron kit has to offer.
Top 3 Choices Compared
| Weller Weller WE1010NA | X-Tronic Digital Iron | Weller WLC100 |
|---|---|---|
 |
 |
 |
| Price: $$ |
Price: $$ |
Price: $ |
| Warm up Time: Fast |
Warm up Time: Moderate |
Warm up Time: Slow |
| Ergonomics: Excellent |
Warm up Time: Average |
Warm up Time: Average |
| Recommended For: Regular Users |
Recommended For: Casual Users |
Recommended For: Infrequent Users |
| BUY LOCAL | BUY LOCAL | BUY LOCAL |
| CHECK PRICE ON AMAZON | CHECK PRICE ON AMAZON | CHECK PRICE ON AMAZON |
The Best Soldering Station For Experts & Novices
| Image | Name | Price | Wattage | Heating Element | LCD | Temperature Adjustment | Changeable Tips | Self-supporting Stand | Safety Shutoff |
|---|---|---|---|---|---|---|---|---|---|
|
Weller WE1010NA | $$ | 70W | Nichrome-wound Stainless | ✓ | ✓ | ✓ | ✓ | ✓ |
|
X-Tronic 3020 | $$ | 75W | Compensated Steel | ✓ | ✓ | ✓ | ✓ | ✓ |
|
Weller WLC100 | $ | 40W | Iron-Plated Copper | X | ✓ | ✓ | ✓ | ✓ |
 |
Tabiger Kit | $ | 30W | Steel | X | ✓ | X | X | X |
 |
Hakko FX888D | $$$ | 70W | A1516 Alloy | ✓ | ✓ | ✓ | ✓ | ✓ |
The 5 Best Soldering Stations Available Today
 Now that you’ve seen our three favorite soldering stations, let’s take a more in-depth look at them. In addition to the three we’ve already learned about, we’ll also be taking a look at some other popular choices we can recommend.
These reviews will focus on what the soldering iron is useful for, who should buy it, and what key features you might be interested in.
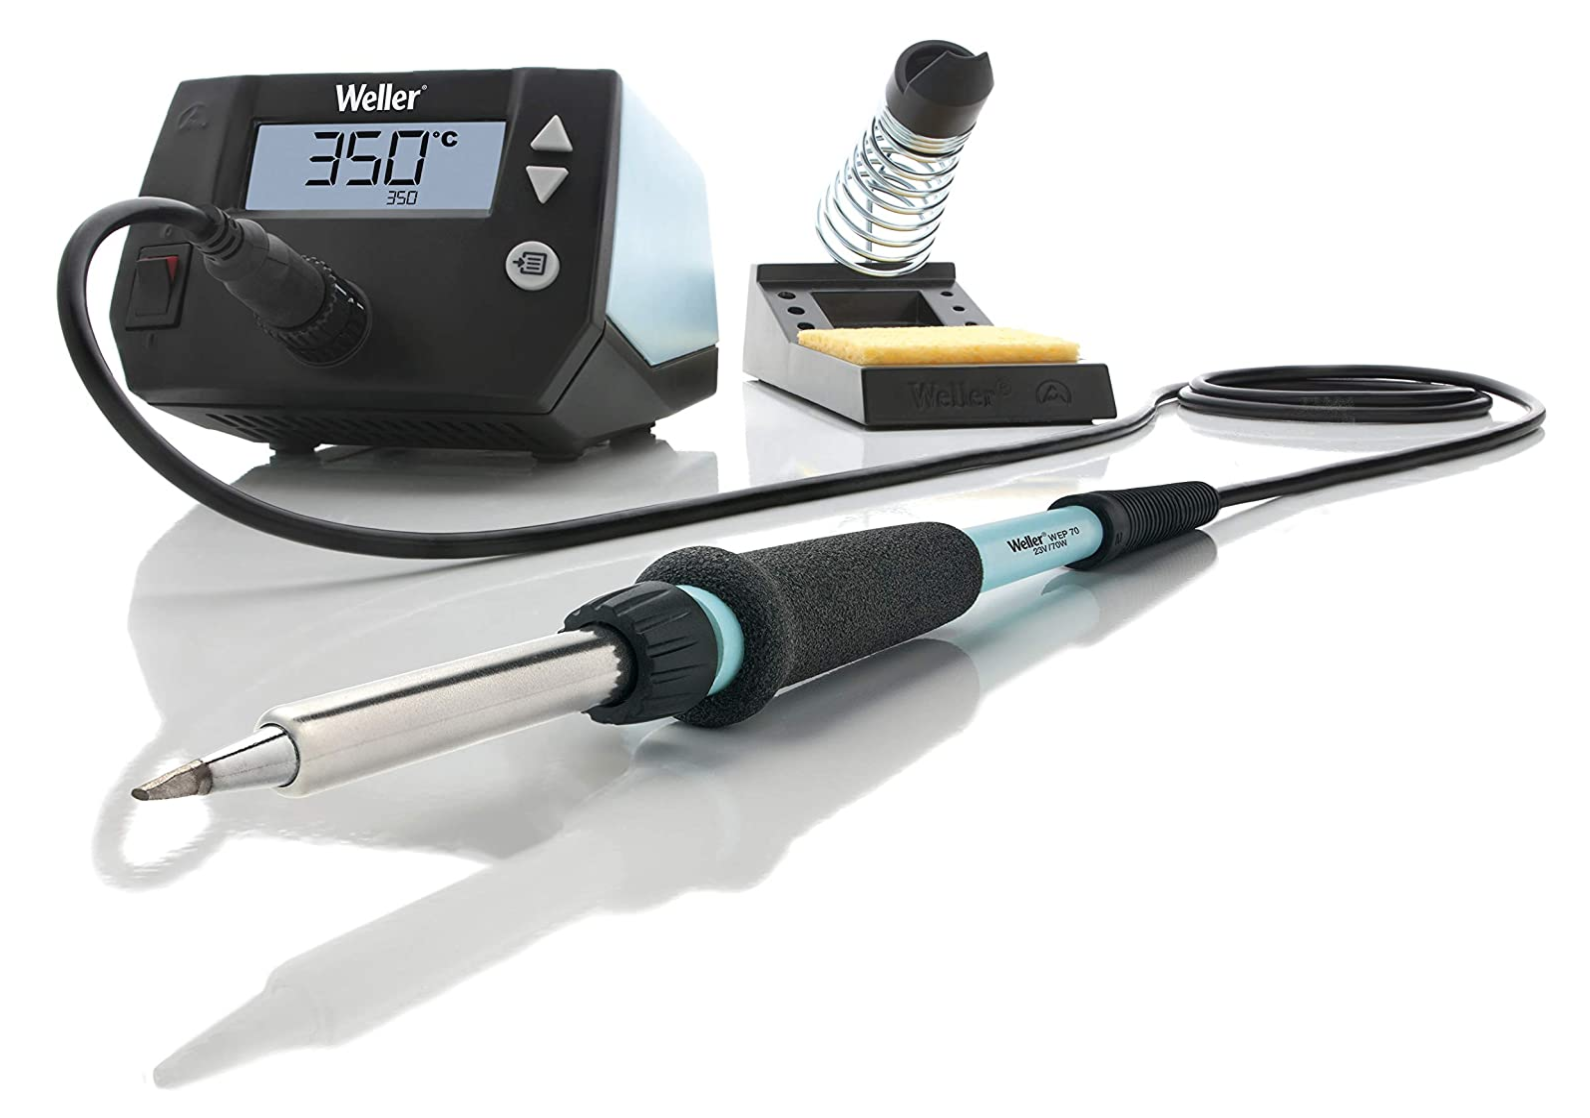
1. Weller WE1010NA Soldering Station
The Best Soldering Iron Overall
Weller is a name that you will recognize if you have done any sort of work with a high end soldering iron station. They’re a trusted brand that makes high quality, reliable products. and this analog soldering station is no exception. We like this analog soldering iron kit as opposed to a more expensive digital one, for a few reasons.
Primarily, the heating element heats up quickly and stays there. The adjustable temperature is accurate, and there is a wide temperature range. The pencil of the soldering iron is well weighted, which allows you to make careful, more precise movements. It’s slim design keeps things ergonomic, so you won’t find yourself suffering from hand-strain after an extended usage session. It also features auto-shutoff, so you don’t accidentally leave your soldering iron on for too long. This saves power and extends the life of the tip.
It comes with a 1/16″ ETA tip but you can get all sorts of different tip sizes for whatever project you are working on. his little kit includes a little holder to rest the hot soldering iron when you’re not using it, so to safely protect your work space, project and your fingers! The stand also has a space for a sponge for cleaning the tip. If you’re going to be using it a lot, consider picking up a few extra heavy duty tips or you may work through them pretty quickly.
Another helpful feature is the temperature lockout. What this does is prevent you from accidentally over-ranging the element. You can crank it up full blast, but as soon as it hits the max temperature it will automatically scale down the element to a safe level. This makes it easy to use, and you don’t have to worry about damaging the iron or hurting yourself. For anyone working out of their home, this is a feature we wouldn’t want to be without.
Although it may seem like this soldering iron is a little bulkier than some, we really loved the design. Weller separates the holster from the power station. The only reason you’d need to touch the power station is to turn it on, or to change the easy to adjust temperature range. You can simply shove this out of the way towards the back of your work station. The separate holster is nice and compact, so you can place it right next to your project. This makes it easy to pick the iron up as needed, and reduces the space needed immediately in front of you. This is great for when you’re involved with larger boards or projects, and one of our favorite parts of this soldering iron.
Overall, this is a high quality soldering station that is suitable for professionals who work with electronics all day, to consumers who just want to carry out a few in-home repair jobs. If you’re still unsure, check out more consumer reviews on amazon to see what other buyers have to say.
2. X-Tronic Digital Soldering Station
An Affordable Soldering Station
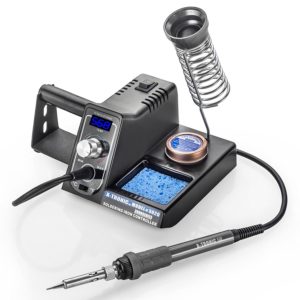
Although a digital soldering station is usually more expensive than analog ones, this X-Tronic model is actually quite affordable. Just like the last soldering iron we looked at, it has an adjustable temperature range via the front knob. But this dial has a much larger range of motion. It’s slow, but precise.
As you turn the knob, the soldering stations digital display reads out your setpoint within the temperature range. Once it’s settled on a specific setting for a few moments, the digital display goes back to reading the actual temperature of the tip. This means that you know exactly when your iron is ready – no more guessing games!
Everything you need is mounted on the compact base: the temperature control, the cleaning sponge and the receptacle to rest the soldering iron in when you’re not using it. This design is more compact and portable, making it a great choice for casual users who want to store it when not in use.
It gets hot quickly and maintains a good, stable heat heat. This is something we commonly find with digital units compared to the older, analog variety. While there are cheaper soldering stations, this X-Tronic model is the best bang for your buck in this regard. The silicone-coated cord is highly flexible, so you won’t have any ergonomic issues, and the built in sleep mode is key for both safety and durability. The soldering iron itself isn’t the most comfortable soldering iron we’ve used. If we had to use it day in and day out it might not be our first choice, but for an hour at a time or so you will have no issues at all. We’d recommend this X-Tronic soldering station to casual users, but you can check out more user reviews on Amazon to find out how other consumers are putting this soldering kit to work.
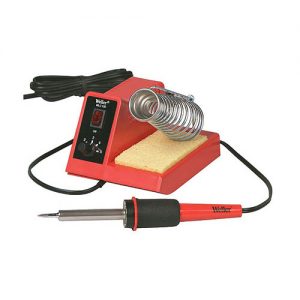
3. Weller Soldering Iron WLC100
The Best Soldering Station on a Budget
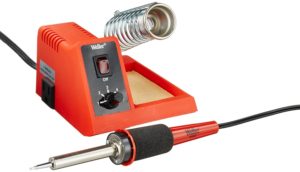
We finish our top-3 list with another Weller WLC100 soldering station. While this one isn’t quite as premium as the first soldering station we reviewed, it’s still got some great features making it a nice reliable option.
The soldering station has a built-in holster to hold the soldering iron when not in use. The cushioned foam grip on the soldering iron is a little larger than the others on the list, but it’s nice and light and we actually found it to be a little more comfortable to use. Included is a 1/8″ screwdriver tip, so you may need to consider picking up a different size depending on your project. The temperature range control isn’t quite as accurate or sensitive as the more expensive Weller above, but it’s still easily changed.
This soldering iron heats up a little slower than others, but does a great job at staying hot. Even though you’re giving up a few conveniences, casual users might not notice all that much. We’re talking an extra minute or so for the iron to get up to it’s temperature range, and a little more space used on your desk. All in all, it might mean tucking away the soldering iron holder when not in use. Sure, this might not give you the accuracy and ease of use you’d get with digital display soldering irons but If these sound like fair tradeoffs for a great bargain, then this is the soldering station for you.
4. Hakko FX888D-23BY Digital Soldering Station
The Best Soldering Iron for Experienced Users
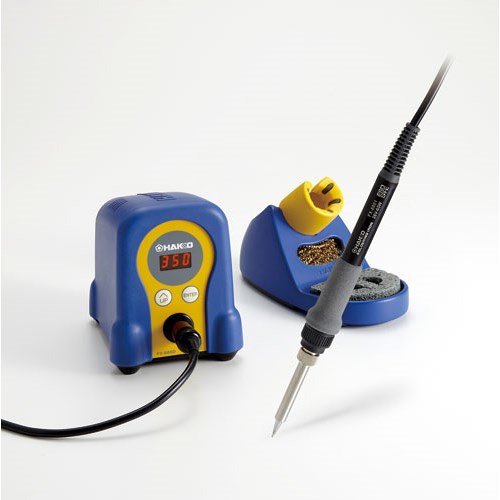
Before we got our hands on this soldering station, we didn’t have very high expectations. You can find a lot of chinese companies offer a pretty impressive looking soldering iron, but end up skimping out on quality. That’s always been frustrating for us, as we always look for something reliable. Fortunately, Hakko is an exception – this high precision soldering station can compete with the big brands. The main reason we find this unit so impressive is it’s iron-plated copper tip. This is one of the major changes since the older model came out, and it drastically improves thermal recovery. From a functional perspective, this means that the tip doesn’t cool down as quickly. With cheaper units, you’ll find that your first joint goes perfectly, but the second one takes a bit more time. This can lead to cold joints or poor quality connections, and you end up having to wait a long time for the soldering iron kit to get back up to temperature. In this case, you can use it almost non-stop without any degradation in performance, and the 70 watts of power it produces really helps. No wasted time, and no more effort invested in reflowing existing connections. This might seem like a minor change, but it makes a huge difference in functionality.
With a name like “Hakko FX888D-23BY,” you might not thing that the manufacturer put a ton of energy into ease of use. But that’s simply not the case. This digital soldering station includes a seperate, detached soldering iron holder that can be places wherever is most convenient for you. The holder has both a cleaning sponge and wire, so you have two different tip cleaners available. The cleaning wire is best for scraping off solder that’s started to cool, without dropping the temperature. On the other hand, the cleaning sponge is good for quickly wiping off whatever is left at the end of your project, or for dropping the temperature a bit.
Like other digital soldering stations, you get a much more precise level of temperature control with this soldering iron as it has a digital display. But when you couple that with the high end tip, you get a very powerful and versatile unit. This would be great for beginners, as it’s so easy to use. But it’s also excellent as a rework station, as it gives you the temperature control you need to work on circuit boards that may have degraded over time. no more fussing with an imprecise dial, just take a quick peek at the digital display to find out your true temperature. Finally, the auto sleep function will make sure that the station is safe to use, as it will shut off automatically when it goes unused for a while. The price might be a bit high for some, but if you are going to use this soldering station regularly, it’s well worth it.
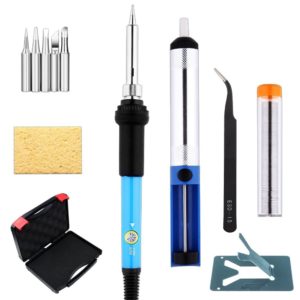
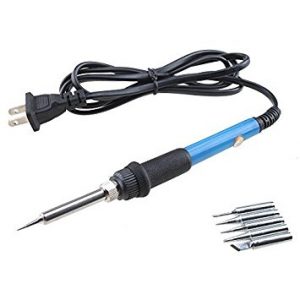
5. Alternative Option: Tabiger Soldering Iron Kit
The Best Soldering Iron for Beginners
This Tabiger doesn’t have a complete soldering station the way the other ones on the list do. Instead, the iron plugs directly into your household power outlet via the 1.5m long cable.
There is a little stand on the bottom of the iron you can flip out when not in use. This will keep the tip off of your table, giving you a way to put it down while placing components, or while waiting for it to heat up.
We don’t typically recommend stand-alone soldering irons, but unlike most option this one has a temperature control adjustment located on the handle. There is no pre set temperature range like you’ll find on other, cheaper models. But you don’t get the digital display you find on more expensive ones.
Included are 5 extra soldering tips, all of varying sizes. This allows you to work on a variety of projects without having to buy any accessories. You also get a little solder. There isn’t much, but there is just enough to get you started, and everything packs up into a handy carrying-case. You could work your way through 10 or so small repairs, or one small DIY project. Overall, there aren’t many affordable kits that include all this.
You also get anti-static tweezers, a solder sucker long(great for removing bad components!) and a compact case to carry it all in. All that’s missing is a cleaning sponge.
If you want to be ready for a few small tasks, this is the iron to get. It’s extremely affordable, compact, and easy to use. But if you are planning more project-based jobs, this might not be the best option.
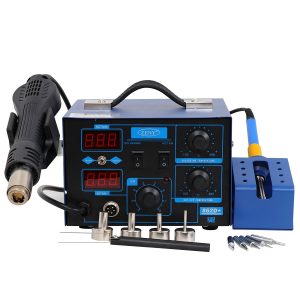
6. Alternate Option: ZENY 2-in-1 SMD Workstation
If you’re operating on SMD components, your typical soldering station just won’t fit the bill. Surface mount components can have hundreds of solder pads. If you’re trying to remove an old chip with the intention of replacing it, you’ll find the hot air gun in this station to be a godsend.
In order to remove a chip you need to liquify the solder on all of the pads at the same time. Trying to do this one by one with an iron just isn’t viable. This design still has a carefully regulated heating system but it’s instead used to produce hot air that can evenly heat up a large area all at once. Now, this rework station isn’t just for SMD components. The ZENY station does give you everything you need for standard soldering jobs, but they also throw in a hot air gun that make it easy to add or remove these types of components.
Although the soldering station is much larger than simpler soldering irons, it’s still much more compact than having two separate units. Because it’s designed for precision work, the LED lit digital display helps you carefully control your exact temperature, so you can get the job done right the first time.
This soldering station includes a variety of tips, making you read to tackle almost any project. While this isn’t for your typical hobbyist, anyone who wants to work on complex electronics will find that this is the soldering station for them.
Soldering Station Accessories
Want a little more functionality out of your new soldering iron? While some of these include everything you need to get started, there may be a few key components you’re missing. Additionally, there are a few optional add-ons that can really make your soldering stations much more effective.
Solder

Even the best soldering tool needs some solder! But you can’t just select any solder, you’ve got to find the type that best suits your project. We’ve had a few people message us to try and figure out why they were getting sub-par results with their new soldering station. And in both cases, the issue turned out to be the solder. We aren’t just full of hot air here, poor quality or incorrect solder type can really cause a lot of problems! Getting the right stuff isn’t expensive at all, so it’s certainly worth looking into. The proper solder helps provide excellent thermal recovery to get better flow. Here’s what you need to know:
Rule #1 – NEVER use solder intended for plumbing
 Plumbing solder is dirt cheap, and comes in bulk. One of the biggest mistakes you can make is to purchase something like this, assuming that you’ll have everything you need for years to come. Plumbing solder contains acid that is designed to help etch through grease and help pipes create a bond. If you use this on a printed circuit board, you can destroy the electrical trace located inside.
We primarily recommend flux-core, lead free solder. Leaded solder is a little easier to work with as it has a lower melting temperature. However, if you have one of the soldering stations with variable temperature the lead free stuff will be fine.
Flux core just means that there is a bead of cleaning flux located at the center of the solder. Flux cleans the electrical contacts and helps create a conductive bond – something that is essential for your joint to function correctly. If you’re using these types of curcuit boards, flux core is extremely helpful.
The next question you need to ask yourself is what size do you need? For simple electronics work, anything with a diameter between 0.711 and 1.64 should work fine. Smaller diameter solder is more precise, but you’ll use a lot more for larger joints. Larger solder is easier to use and lasts for quite a while, but you lack the ability to regulate the quanity of solder used like you’d get with a smaller roll. If you have one of the soldering stations with adjustable tips, get a variety of sizes.
For beginners we’d recommend starting with 1.22mm solder – this is the same thickness of an 18 gage wire. This provides a good balance between ease of use and accuracy. It’s forgiving, but you won’t struggle to get enough solder on the joint.
Soldering Station Tips
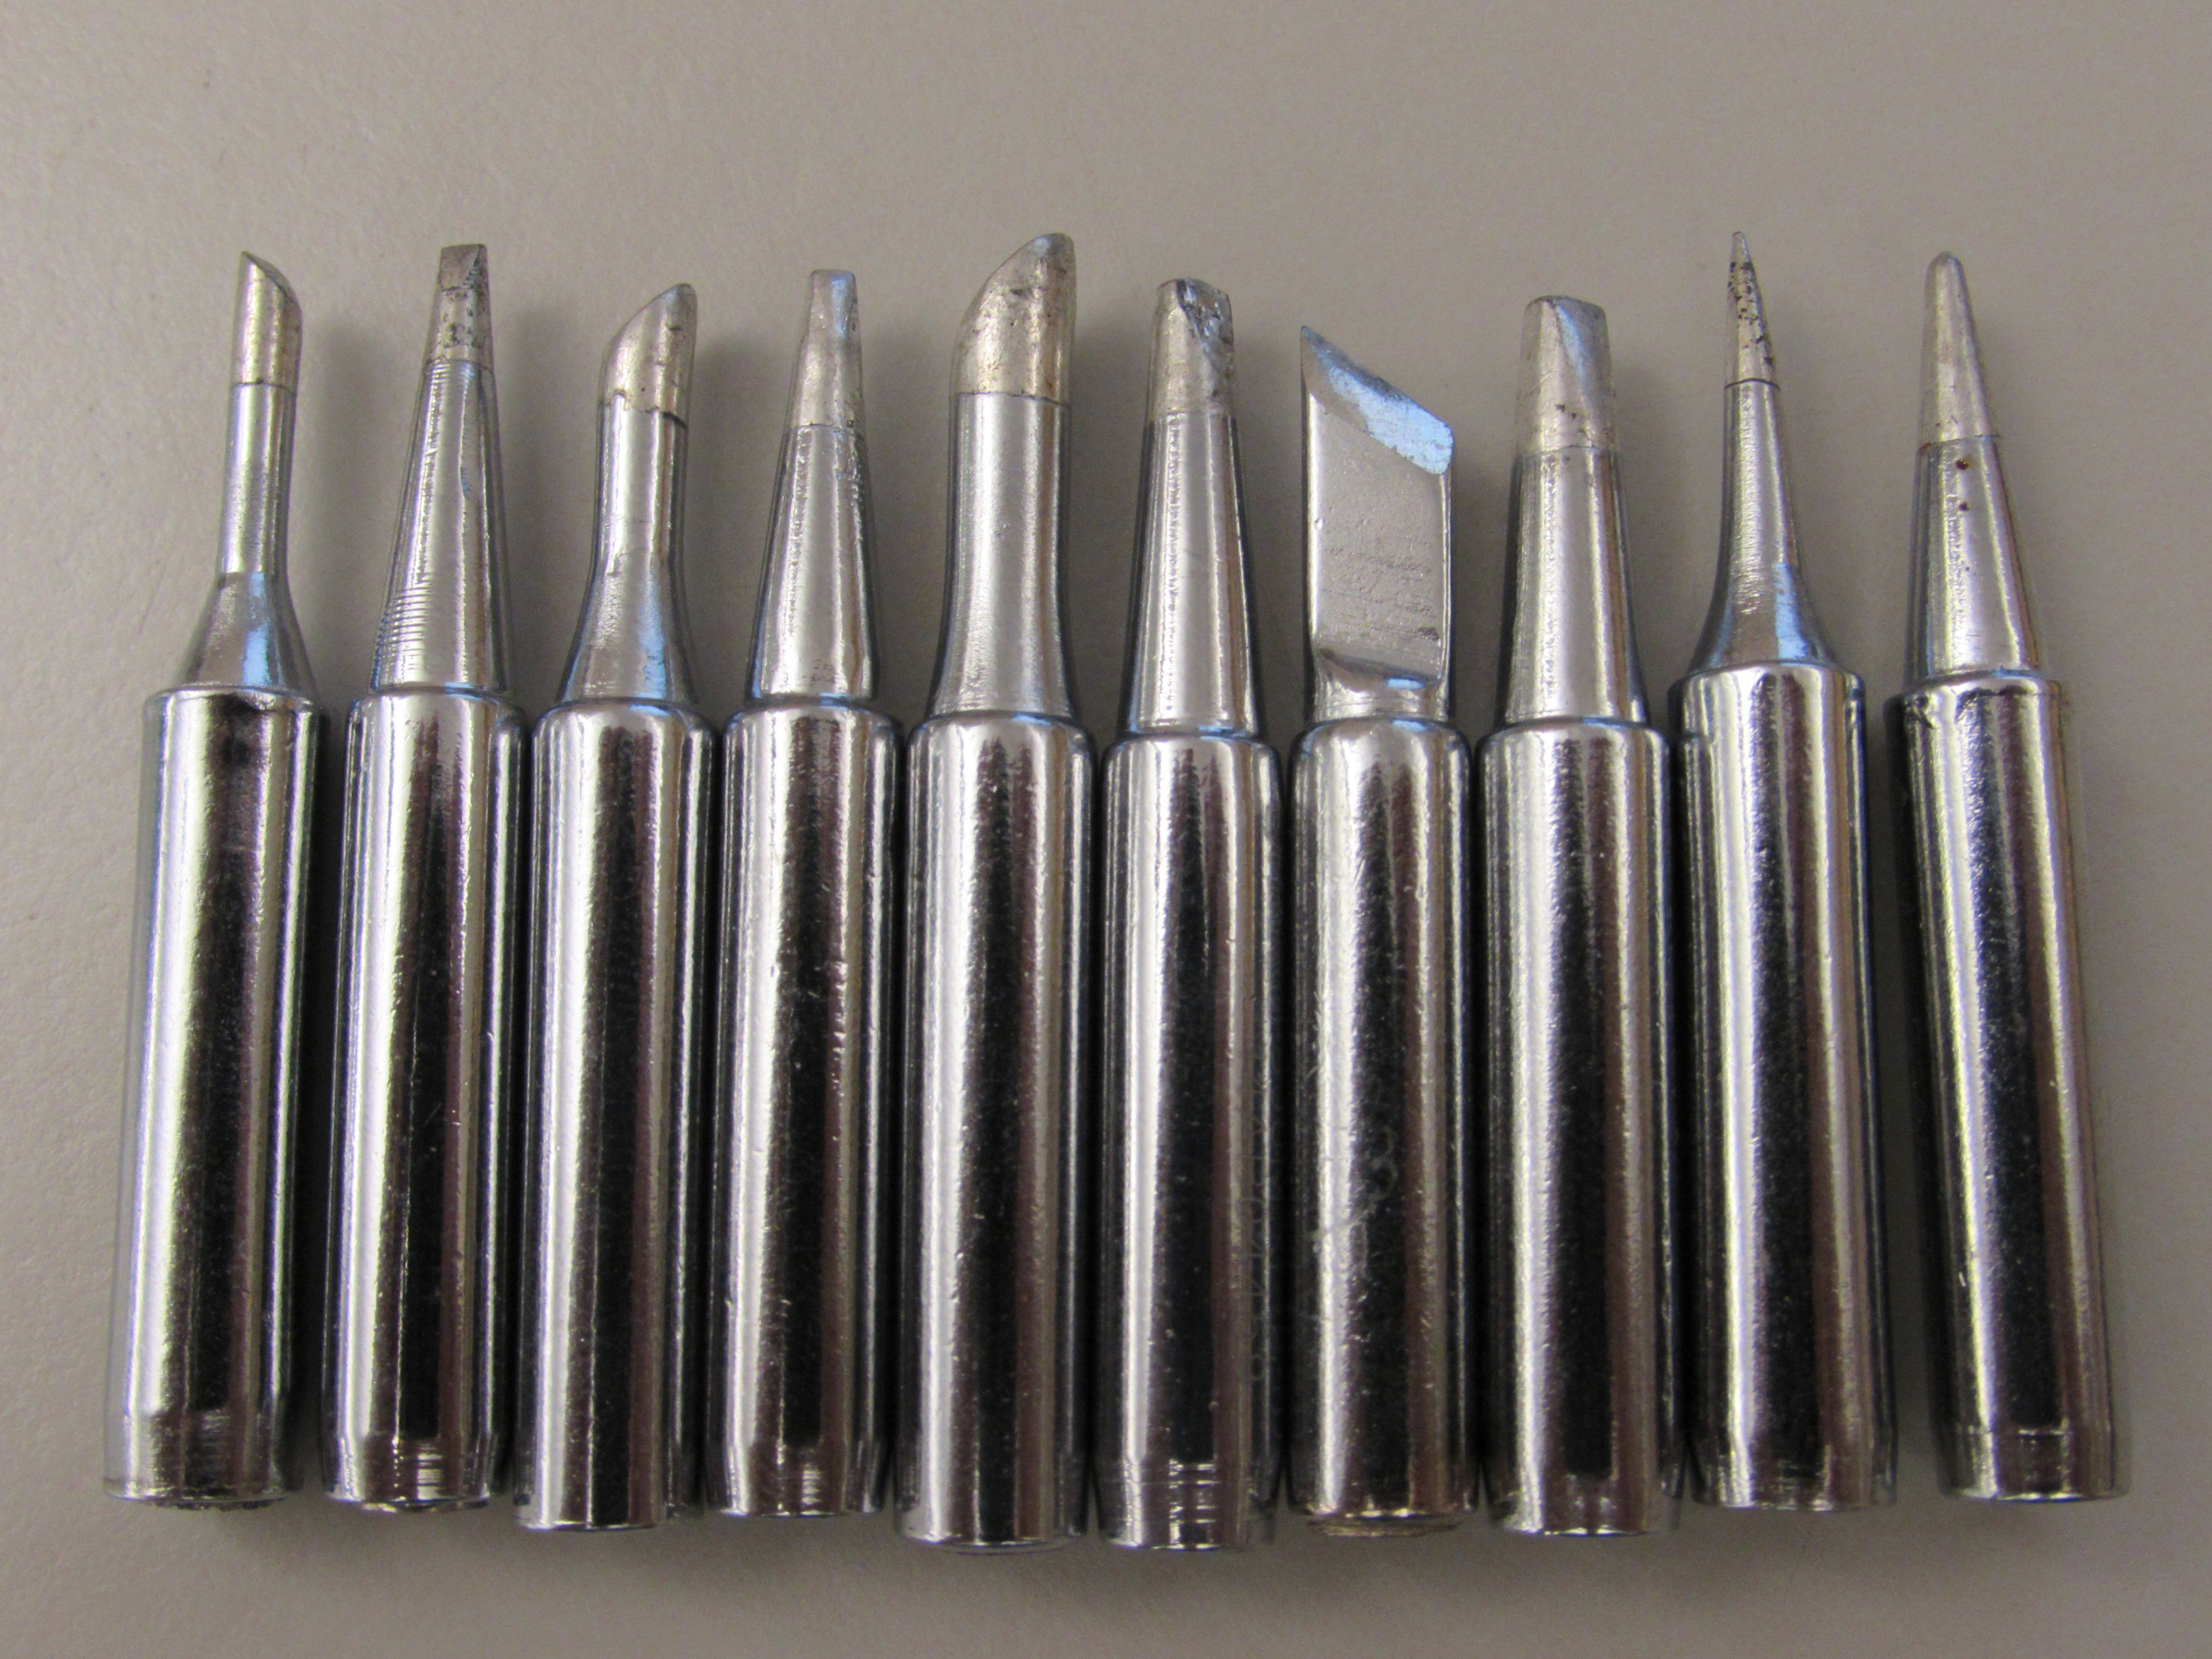
The size and shape of your soldering tip will determine how you lay your bead. Different tips are suitable for different applications, and each have their own sets of pros and cons.
Before you buy any tip, the first thing you should do is find out what is compatible with your soldering station. You don’t have to buy the brand name tips. Weller soldering stations can easily be used with 3rd party tips. Many are similar in design, and the more common irons use interchangeable tips. But you do have to check the size in your user manual and make sure you select something that matches both your iron and the size of the components on your circuit board.
Next, consider the shape of the tip. A chisel tip is the best place to start for beginners. it has a nice flat surface so you can hold it in place, and by positioning it in different ways you can work with a variety of different wire and component sizes. Chisel tips are great for through-hold breadboard, SMDs, wire-to-wire joints, and even de-soldering components. It’s a bit like the jack of all trades tip.
Hoof tips are great for drag-soldering multiple surface mount pads, although this is definitely a technique for those with advanced skills! But if you plan to work with SMD devices, a hoof-tip can help you take on more advanced soldering projects when coupled with the right soldering stations.
Conical tips are much harder to use. They can be very precise, but we’d recommend them only to advanced users. If you’re experienced enough to use a conical tip, you’re probably not reading this section so we’ll skip over these.
you’ll also want to factor in the material it’s made of. Iron tips are more durable and cheaper to produce, but they don’t hold or transfer heat nearly as well as a copper tip. A really high end soldering iron will have an iron coated copper tip, so you get the best of both worlds.
Sponge or Brush
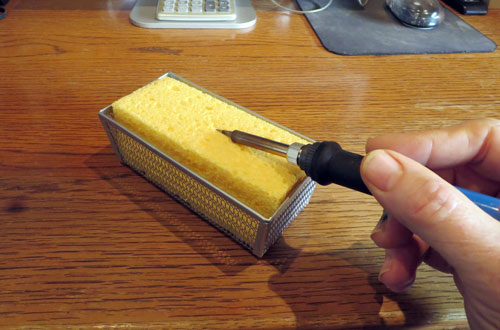
You need something to clean off the tip of your soldering stations, and there are two ways to do that. Most people just damp a sponge and wipe off the tip when necessary. This is going to be the number one choice for simpler jobs, as it’s the easiest tip cleaner to wash and reuse later.
if you’re removing a lot of solder or doing big jobs, you might want to get a brush. These look like the scrubby pads you’d use on tough dishes. They’re able to remove lumpy or burned-on residue from your soldering stations, and are a great purchase if you’re looking for a quick and easy tip cleaner to keep your iron fresh.
Helping Hand
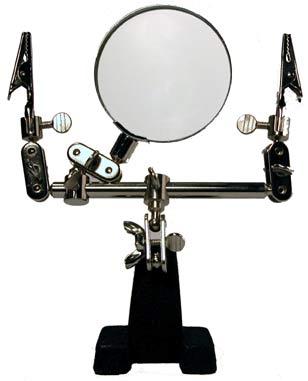
You ever try to solder two different components together with a soldering station in one hand and solder in the other? Let’s be honest, you’ve only got two hands. While some skilled technicians wield their soldering stations like a sword, most of us will struggle in the beginning without a little help.
Instead of bribing your friends to give you a hand, why not use a mechanical hand? The best soldering techniques require one of these things. These tools feature two alligator clips and a magnifying glass. This lets you hold your components in place, and get a better look at your soldering projects. This is a cheap add-on, and we couldn’t imagine trying to solder without one.
Desoldering Pump
It doesn’t matter whether you’re a beginner or an expert, at some point you’ll likely make a mistake. And this is where a de-soldering pump comes in handy. These hand tools are simple in nature, typically just a large ball with a little nozzle on the end. You squeeze the ball, and place the nozzle near the solder you want to remove. When you release the presure, the desoldering pump sucks air in to remove your now-liquified solder. Whether you’re correcting mistakes or removing old components, this is a must-have accessory for any soldering kit and generally only costs a couple bucks!
What We Looked For
There were a few key features we looked for when purchasing soldering stations to test. Once we had them on our bench, we also had a list of criteria that we used to grade them.
Price
The first factor was Price. There are many inexpensive soldering stations on the market, but you can also find a professional-grade soldering station that costs hundreds of dollars. After interviewing dozens of professionals who solder all day, we determined that these high-end units are generally not necessary. They were designed for very specific applications that required a great deal of precision. In fact, most technicians never felt the need to upgrade from their midrange soldering iron. In our initial testing, we found that soldering stations that range in price from $10 to $75 can be good enough to support the needs of most consumers.
Power
 After looking at the specifications, we determined that a good soldering iron would use a minimum of 30 watts of power. In this range, irons can heat up quickly and be ready to work without a long wait. Additionally, this power is required to maintain an even temperature when being exposed to cold boards and solder. If you go any lower, you’ll find that you have to wait a long time to use your soldering station, and also will have to take frequent breaks.
Temperature Range
 Within the temperature category, there were two key things we wanted to look for. We wanted to select soldering stations with an adjustable temperature range so that they could be used for a variety of projects. It was also important that the functional range covered all of these different needs.
Once the element was up to temperature, we wanted to see that it maintained the desired setting consistently. Some soldering stations would vary wildly, or didn’t stay very accurate. If this was the case, we rejected it and moved on to something that would.
Ergonomics
 This one is simple: a soldering station has to be comfortable to use! Anytime precise work is involved, an awkward or uncomfortable soldering station can really make a job frustrating. Additionally, the level of comfort can change depending on whether you’re working on a circuit board or simply connecting components directly. We had to factor in both of these situations. Although not everyone is going to be using their iron for long periods of time, we made sure that every option on our list would be comfortable for regular, long term use.
Additional Features
While not a core requirement, there were a few key things that helped us select these soldering stations. We looked at the irons compatibility with commercially available tips. It was important to us that tips could be replaced easily, and that consumers would have the choice to use 3rd party tips if they so desired.
We also considered any bonuses that were included with the station. Was there a case? A kick stand? Any additional feature that we found to be useful factored into our decision making process. But if we found that a soldering gun had too many gimmicks and didn’t perform as well as competing models, we’d overlook the bonuses. Usefulness is key.
The Five Types of Soldering Iron stations Available
Soldering irons can be divided into three separate categories: Pencil, adjustable, cordless, torch, and station. Each of these have their own sets of pros and cons, and it’s important to understand the differences between them so you know why a station could be advantageous to you.
Soldering Stations
 A soldering station is essentially an all-in-one device. It includes a stand that allows you to place the iron somewhere safe when not in use. While some people might just lean it up against a sponge or on the table, this puts you at risk for burns and damage. Additionally, anything making contact with the tip will make it difficult for the heating element to regulate temperature.
Not only do soldering stations make it easy for the iron to maintain a consistent temperature, but most models offer a rotary potentiometer on the face that gives you an controllable temperature setting. Depending on the type of project you’re working on, the size of the area you need to solder, and the metals involved, different temperatures are needed for different processes. Having an iron that can be set to a specific temperature allows you to work on a variety of projects without needing a variety of tools.
Adjustable
Adjustable irons work just like the soldering stations, but don’t include the base. You will usually find a temperature adjustment somewhere on the body, often at the back. These irons are a great addition to a permanent work bench, but are not ideal for beginners. If you don’t already have a workspace set up with an iron stand, you’re better off getting a station.
Pencil
 Pencil irons are by far the cheapest. For this reason, they’re the most common models you might find in your local store. Many of the technicians we interviewed started with a pencil iron, but most quickly upgraded. Best soldering strategies require features that these don’t have.
Pencil irons plug straight into the wall and do not provide any kind of temperature control. This limits the types of projects they can be used for, and the lack of an iron stand creates an ergonomic hazard that makes them difficult to use.
Cordless
 Wireless irons are popular among technicians that need to solder on the go. Aircraft and automotive technicians, for example, commonly use a cordless soldering iron. But there are only a few specific circumstances where we could ever recommend a model like this. They tend to devour batteries, with some models only lasting 20 to 30 minutes. Additionally, they have a much lower temperature threshold and heat up quite slowly. You might chew through half your battery life just waiting for the iron to get up to temperature.
If you have to solder somewhere that you won’t be able to run an extension cord, this can be a good option. But in most cases, it’s best to pass over these models.
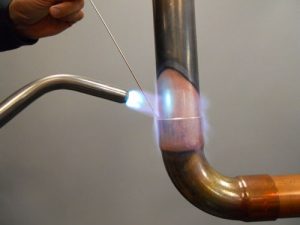
Torch
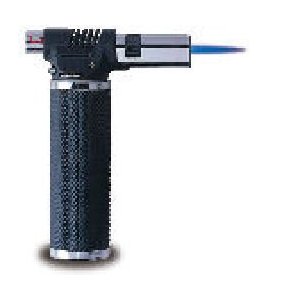 Torch soldering guns aren’t really an iron at all. This gas-powered tool shoots a precisely controlled flame out of the tip that allows you to heat metals up to a specific temperature. If used on electronics, soldering torches can destroy all of the nearby components to the area you want to solder.
Torches are generally used for brazing – a technique where copper pipes are joined together using solder. Because you have to heat up a large amount of metal quite quickly, a torch is the only way to get the job done. They are also used for stained glass. But when soldering electronics, this is simply the wrong tool for the job.
Using Your Soldering Iron For The First Time
Even if you’ve never picked up a soldering iron before, you can still successfully make your first connection with just a little practice. Once you get the hang of it, soldering is actually quite simple. The best soldering experts can almost do it in their sleep. That being said, there is a chance of personal injury or damage to your home if you don’t follow the proper procedure. To help you get started, we’ll run through the absolute basics with you.
If you have already got some time behind the bead, this guide might not be for you. However, feel free to leave a comment and share your tips and tricks with other beginners who may be reading this article.
Step 1: Gather The Right Tools For The Job
There are several things you will need to get started, most of which have been covered in this guide. Of course, you’ll need your iron and some solder. We also recommend grabbing a helping-hand (the tool, not a person!) to help you hold all of your components.
There are also a few things you might need that weren’t covered in this buyers guide. For starters, side-cutters for trimming wire, as well as the legs of your components. Wire strippers are essential if you’re not going to be board-mounting your components. Even if you are, strippers are cheap and VERY handy to have around the home, so we’d recommend you pick up a pair.
If you’re doing repairs, you might want to grab a solder wick or a de-soldering brush. This will help you remove damaged components and clean the contact for replacement. They’re also handy for correcting mistakes, which happen to anyone (even us experts!)
Step 2: Understand The Process
Solder is a combination of metals that melt at 400 degrees. you’ll place your components where you want to make electrical contact, heat up the surfaces you want to mate, then apply solder.
If you want more information, you can check out our article on how soldering irons work.
Step 3: Prepare Your Iron
Straight out of the box, your great soldering iron isn’t quite ready to use. Before making your first connection, you have got to tin it. This process is pretty simple. Just let your iron get up to temperature, then touch a little dab of solder onto it. Just a thin coating
Step 4: Heat Up The Components
With your component mounted on the circuit boards, hold the tip of the soldering iron so that it’s touching both the component and the pad. If you’re joining wire, you can twist the wires together and hold your iron across the connection. Keep it there for 10 to 30 seconds. Once you think it’s hot enough, tap the solder to the components you want to join.
It’s important that you don’t place the solder on the iron. Just touch it directly to the electrical lead. If the components aren’t hot enough, it won’t bond. If it does start to melt continue to apply it until you have a smooth little bead around the parts. Remove solder, leave heat on for a few seconds, then remove the soldering station.
Step 5: Remove Heat
Pull the tip of the soldering iron away from your components. It will take a few seconds for the liquid to solidify. You can tell because the shiny top will eventually glaze over. ew seconds to cool off, then give a little tug to make sure it’s joined. you’re all done!